Ways for Levelling a Sloped Garden: Fix your Steep Lawn or Sloped Garden
One day, I decided to level my sloped garden, but I didn’t know where to start or how to begin. I did a lot of research on different websites, YouTube, etc., but just researching was not enough; I implemented and tried different methods.
Many of you just drop the plan by seeing the hard work required to level a sloped garden. However, it’s not right to give up unless you try.
I am here to help you and guide you on how to level a sloped garden, and I promise that after leveling the garden, you will be amazed to see the result. So, don’t give up and start finding a solution.
Levelling a sloped garden:
To have a sloped garden in your house does look beautiful but is very challenging to maintain the garden. You need to mow the garden and having a sloped garden make it difficult to mow the lawn or plant flowers. In case the slope actually too steep it will be more dangerous and will lead to soil erosion and water runoff and all this will cause damage to other properties and nearby areas. So knowing and performing the task to level the garden is important.
The task of leavelling a sloped garden is a challenging task but you can do it easily by following all 10 necessary stages. In this method, there are certain steps such as evaluating the slope, gathering the required tools, marking boundaries, removing vegetation, excavating the area, adding soil, checking the level, building retaining walls, preparing for the new plantation, and maintaining it.

Things Required to Level a Slope:
Performing the task is quite challenging and you need to have some particular tools for levelling a slope of the garden such as:
- You need to have a couple of stakes with some string that is used for measuring the rise and run of the garden.
- Need to have a spirit level which is used for checking the flatness of the garden.
- You need to add water to moisten the soil.
- You also need a shovel that is used for digging soil.
- Need materials for retaining walls to cover the later section of your lawn.
- Require to have soil compactor that is used for squashing.
- Need to have grass seed or turf for forming a new lawn.
How To Level A Sloping Garden?
The way of levelling a sloping garden is the same procedure whether the slope faces away from your house or toward your house.
However, if the slope faces toward the house then you need to leave a walkway between the house reading wall and the house to give space for access and drainage. To level a slope you need to do a lot of work just reading will pretend it is an easy task so after reading the information go through the video provided below to get some demonstration of the entire process.
The following are steps to start and ways to level the slope of the garden:
1) Make Sure to have Permission:
- To have permission is an important step and never miss it.
- You should go through the utility companies and local council to find out if there are no cables under the garden which will be disturbed.
- You also need to find if there is any need for planning permission then you need to acquire it before you start your project.
2) Measure the Rise And Run of the Slope:
- In this step, you will determine how tall your retaining wall is as for the slope you need to place stakes on each at the top and bottom of the slope and need a string for tying them.
- Here the string is called the run and the height of the run on the second stake is the rise of the slope.
- The top stake of the string needs to be at ground level and stretched them to reach to other stake.
- Now you need to solace a spirit level line for checking the level of the garden
- You should be careful for performing the task as the new garden or lawn will follow this line of the run.
- Following all these steps will help to determine the height of the retaining wall and the amount of soil you need to fill the gap between it.
- After getting the rise and run give the measurements of two sides of a triangle from which you can calculate the area of a triangle then multiply the area with the length of the retaining wall which will give you the volume of space you need for filling the retaining wall.

3) Water the Ground:
- You need to water the ground to help you to easily dig the ground and must be done at least 24 hours before starting the digging.
- Make sure not to over-water the soil as it will be difficult to complete the task with too wet soil.
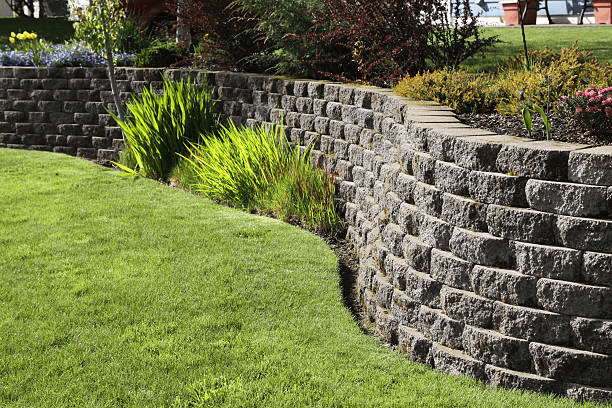
4) Build the Retaining wall:
- The retaining wall is built to provide support to the newly raised land and help prevent the new flat garden to get collapse after rainfall.
- The wall is used to hold the pressure of the soil and after raining with the help of the retaining wall the water gets soaked away.
- You need to use the material for building a wall that is strong to reduce the risk of collapsing.
- Build the retaining wall not more than two feet tall.
- You need to build the wall thinking that need to handle a high amount of pressure.
- In case the slope of the garden is above 2 feet then you need to build a series of terraces that can be installed by the same process you do for the retaining wall.
5) Pile up soil behind the retaining wall:
- After the wall gets stable and erected you can pile soil behind the wall.
- You need to complete the process carefully until level ground is achieved.
- In case you are raising a new lawn you need to bring a topsoil for filling the gap behind your retaining wall.
- You can also use the soil used for lowering the part of the garden and use it to fill the gap behind the retaining wall.

6) Ensure the new lawn is level:
- It is important to check the soil is compact, and level properly in a correct way.
- There may be some cases where you need to add or remove the soil even before starting the next step.
- You need to lay it out on the lawn and make sure to check the lawn is flat and even.
- Here you can use the stakes method and put the stake in each corner of the lawn and the string method to run them between at an even height in each stake.
- If the lawn is totally level then the string will also be leveled.
- At last, you need to add a layer of compost uniformly and maintain thickness on top of the lawn soil and that will provide enough nutrients.

7) Compact The Soil:
- After reaching this stage, the soil is leveled and now compacting the soil will help to remove air and cavities.
- Continuing this step will reduce bumps and lumps that appear in the newly leveled garden even after the next rainfall.
- Doing this will protect the soil integrity of the retaining wall and maintain more consistent pressures.
- You can also run the soil compactor in back and forth direction over the soil which will be good for lawn soil.

8) Plant A New Lawn:
- Here is the step where you need to plant or place grass on top of the soil.
- To grow grass from seed you need to scatter the seed over the soil as per the mentioned directions on the seed packet.
- In case you are using turf you need to lay the sheets out flat and place them close to each other.
- After the seed growing roots, you will not see any lines or gaps between any pieces of grass seed.

9) Compact The Turf:
- Now you need to run a lawn roller over the turf.
- Doing this will help in taking the roots more quickly and will help in growing good grass for walking on it.
10) Take A Moment To Appreciate:
- After doing all the hard work if you come to the last step, I will congratulate you because its a tough work and you deserve to be appreciated.

Benefits of Leveling the Lawn:
A leveled lawn will give your house an aesthetic appearance. The following are some benefits of leveling the lawn:
- The levelling of the lawn will help in improving drainage.
- When the lawn is leveled properly it will be easier to mow and will take less time.
- It will benefit from safer playing surfaces to play games and outdoor games.
- There will be less risk of getting tripped or falling and causing accidents.
- It will help in improving the health and appearance of turf grass.
Top Tips For Levelling A Sloping Garden:
Here are some tips that will help you for levelling a slope in your garden:
- Doing the levelling of slope by yourself you can use the soil you dig to level other places in the garden.
- Renting to use skipping is expensive and removing soil will rampen the price of the job.
- Giving the money to pay for the labor is the point where you can save money.
- The right time for levelling the lawn is in early spring which gives the new grass the best chance to grow more strong over summer.
- I will suggest you retain walls not more than 2 feet high.
- You need to make weep holes at the bottom of stone or concrete walls which will cause water to drain from the soil behind and will not create risks of becoming unstable by the pressure of the amount created on the wall by the soil behind.
- You need to be careful about the weight of water while you design the wall as it can also collapse with the extra pressure on the wall caused by rainfall.
Conclusion:
Hence following all these steps will guide you on how to level a sloping garden and will help in transforming an uneven garden into a perfect even layer.
